Sunday, January 22, 2012

National Pie Day

 January 23rd has been designated as National Pie Day! I am all over that!

My favorite, quick to make pie.(It can be made from scratch scratch for those hardcore scratch bakers.  Just substitute jarred lemon curd for your favorite curd recipe, approximately 3 cups COLD whipping cream, whipped  with 2-4 tablespoons sifted powdered sugar until medium stiff (don't want them too sloppy nor too stiff but I tend to lean toward the stiffer side of medium than the softer side...but both ends of medium will work), and your favorite pie crust recipe.)


My Favorite Pie

1- 10 ounce jar lemon curd; divided
1- 8 ounce pkg. cream cheese; softened
1- 16 ounce container Cool Whip; divided
½ cup powdered sugar
1- deep dish pie shell; baked and cooled

In mixer bowl, add softened cream cheese and beat several minutes, until creamy.  Add powdered sugar and beat until well blended.  Add ½ of lemon curd and beat until well blended.  Scrape down sides of bowl and beat a bit more until all is thoroughly mixed.  Fold in ½ of the Cool Whip and set mixture aside.

To assemble: Spread remaining lemon curd evenly on bottom of baked pie shell.  Add the cream cheese mixture on top, and spread smooth.  Top with remaining Cool Whip.  Chill until ready to serve.

Notes:  If you like a tangier pie, add lemon zest to cream cheese mixture.
          If you’d prefer, use a smaller pie shell when assembling.  When done, mix the leftover components well and store in freezer (don’t forget to date and label-this is too good to let go to waste).  Thaw, re-stir and enjoy.
          (I make 2…one to serve and one to freeze.  Since I want lemon more than others in the house, I pre-slice the second one so I can remove a slice when I want, the rest remains frozen.  Round pie sized storage containers are perfect for this!)

I hope you enjoy this as much as I do!


Tuesday, January 10, 2012

Continuation of the kid-size couch/sofa

     I first thought to edit the previous post and add the next set of photos but, didn't think those following would get an update.  So, I opted to continue with a new posting.  For those dropping by for the first time,  you'll find the beginning of this project here.

     Although I didn't take pictures of it (I was pretty annoyed with myself for such a bubble-headed mistake (I will elaborate later in the post)), I wound up remaking the seating frame which is simply a rectangle with a center support (If I were making a larger sofa, I would definitely add more but, for this small of a piece, surely one would suffice).  The first one (the 'mistake') was 11" deep and was not deep enough considering the thickness of the back cushion.  I remade it to approximately 18" deep.  Deeper than originally planned - 14" but a great deal better than the 11" originally wound up with (okay!  When deciding how deep the make the couch, I extended the measuring tape to 11" and used the length of the measuring tape case, 3", to make up the difference making it 14".  Well, when I went to mark the wood, I forgot that I used the case length in my visual and placed the tape against the wood and begin marking it where it was set, at 11".  Goof made.  Goof identified.  Goof corrected.).


See!  I even experimented with pocket screws!  I think I got the general idea of them.


As soon as I acquire some more wood (I've been rummaging through hubby's stash to spot any pieces so I'll know exactly which ones to ask him for), I'll add more front to back braces for support as well as structure for the arm padding.


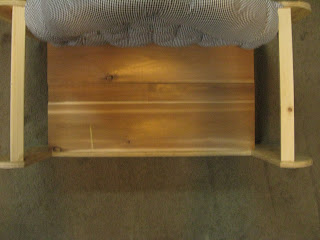
I'm not sure if I'll use them but, I cut some cedar planks (cut and spliced the center) that were leftovers from a park bench restoration (hubby's honey-do project).  I like the way they look and almost feel bad about them being covered up by upholstery.  It's either the cedar or having to use ten thousand (alright...maybe not that many but, a lot) pieces of scrap...  I just don't know.  The cedar is in place but I've not yet attached it.


Sunday, January 8, 2012

Dabbling In Furniture Making

     I have absolutely no experience in furniture making.  However, I am in the middle of making a kid-size sofa.  Some of the templates (made from an old cardboard box) have been drawn and cut out.  I figured, if it turns out, I'd be able to duplicate it without too much trouble.  I know how I want it to look but am having difficulty getting my ideas to work.  I know the framework won't be seen but I'd like it to be secure AND tidy. 
     The foam was ordered from Joann.com using a 50% off coupon a couple of months ago.  Due to all the to do of the holidays, I didn't open the box until today.  I now know how they got all that foam into such an itty bitty box...it was rolled and vacuum packed.  It's opened and unrolled.  I sure hope it regains its' shape.  Otherwise, the sofa may just wind up being an unpadded bench.
     Since this is an experimental piece, I am using scrap wood left over from other projects.  The back and from pieces were cut from a half sheet of 3/4" plywood (it has splotches of various paints and stains from where it was used as a surface to place other items on while painting them).

The back panel template.  On the left, I've marked it for tufting (if I'm going to be experimenting, might as well experiment with a variety of techniques, right?).


The front panel template (laying on the cut out pieces of plywood).  You can see the holes have been drilled in the back piece, for tufting and the front piece has also but cut.

Because of the thickness of the foam and batting, a longer needle was necessary.  Being that the nearest store with the possibility of an upholstery/tufting needle (I don't know its' actual name) in stock is almost 30 miles away, I used what I had on hand - stiff stainless steel wire and masking tape. A workable length was cut, the end looped, and taped to itself to prevent snagging.

The underside.  Thick bamboo skewers (again, using what I had on hand) were cut into approximately 3" lengths and used to secure the knotted tufting threads

 
The layers used were, the 3/4" plywood,

 
4" thick medium density foam,

high loft fiberfil sheeting,

2 layers of high loft quilt batting (I thought I was buying more of the fiberfil sheeting but, as it turned out, there is a difference...the fiberfil sheeting is loftier, more like what one would use in a comforter and the quilt batting is denser or more tightly compacted.  Here, I thought high loft was high loft.  I'll be sure to check closer should I purchase it again)


Red piping, cut into approximately 3" pieces, folded over, to use for the tufting.  I had originally planned on using just fabric covered buttons but, after looking at them then, assessing the task for which they were to be used, I decided the buttons didn't look like they could handle the strain of tufting and will add them later as adornment only.


I love the look!


After all the pulling was done, I acknowledged what I could've/should've done differently (that is a big factor of this experimental project afterall) as well as realized how much work goes into tufting and have a new found admiration and appreciation for those that do it all the time.


Monday, January 2, 2012

Resolutions For The New Year

     I've not made any resolutions.  Well, none that I shared with anyone else.  I've made goals for myself but, that I do throughout the year.  So, I don't count them.  I have decided not to tell anyone the plans or goals I have for myself.  Instead, I will simply take steps toward them.  Talk less, do more.  Catch up when I get sidetracked (aaaaaaaand I know I will).

All the best to you all!

Sunday, January 1, 2012

Happy New Year!

     I wish everyone a productive, rewarding, and a deep-down-in-the-soul-fulfilling 2012 with obstacles not so big they can't be overcome but big enough to leave you with a feeling of accomplishment after they've been surmounted (afterall, ya gotta have some strugglin', right?).  Now, get to work on achieving those goals!